BlogHow to install a recessed shower valve into a brick wall
How to install a recessed shower valve into a brick wall
posted on 28 Apr 2019
In this post I will give you a step by step instructions of how to install a recessed / concealed shower or diverter valve into a masonary wall.
Picture below shower a completed installation of a shower valve diverter into a chimney breast:
Shower valve installed into a brick wall.
If you would like to watch a full video of this installation please scroll down. You can watch it without sound as it has captions. Otherwise keep reading.
Installing recessed shower valve into a brick wall guide:
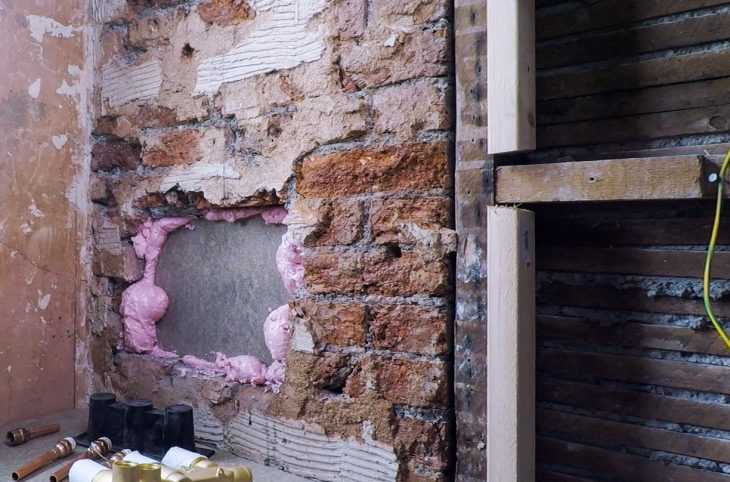
Remove one layer of brickwork (if you have a double wall) or alternatively chisel out half depth of a brick. Depth will depend on your finished wall. In most cases recessed shower valves will have to be inset by between 70mm to 100mm from your finished wall level. One brick depth is usually 80-100mm so taking full brick out is usually too deep but it allows us to get much flatter surface than tyring to chisel out half a brick.
With one layer of bricks removed cut out square piece of 18mm marine plywood or 18-22mm moisture resistant chipboard and fit it into the niche you created. The tirck to get it nice and level is to use expanding foam adhesive. Best way to install your board is to cut it 10-20mm smaller than the opening, position it in place and then use expanding foam adhesive to fix it in place. Most expanding foam adhesives are fast curing so you will be able to continue with installation of your valve in less than an hour. This is the stuff that I use: https://www.everbuild.co.uk/product/pinkgrip-dryfix-fr/
board fixed on dryfix adhesive
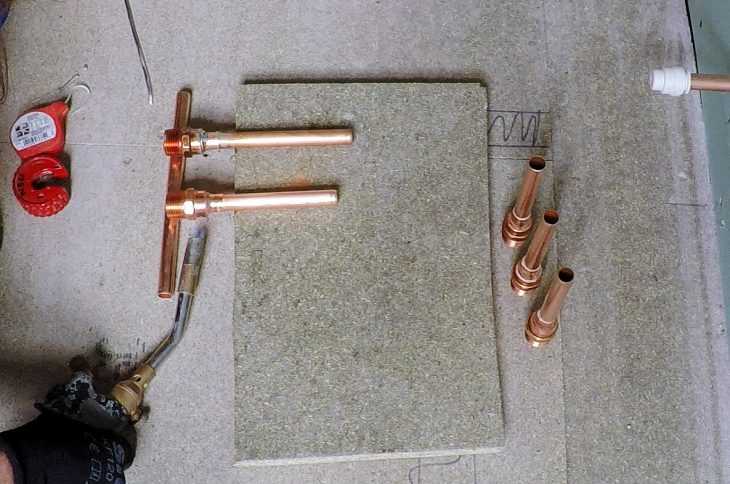
Now we will install our pipework to the valve before installing it on the wall. In my case I am using 3/4 inch male to female adapters that go into the valve body and I reduce them from 22mm to 15mm end feed copper. I pre solder short (100mm) copper pipework before fixing 3/4 inch male adapters into the brass body. You do not want to be soldering to close to the body as the body will act as a heat sink and you will run a rick of damaging the valve. Pre soldered 3/4 male adapters below:
Next step is to get those pre soldered adapters installed into the valve body. To do that you can use PTFE tape. I prefer to use Loctite 55 as it is a much better product. I am not a big fan of using compression fittings on inaccessible plumbing that is why I advocate pre soldering end feed adapters and making soldered connections only. Obviously adapters themselves are screwed into the body. I suggest using Loctite 55 for that purpose as I do find it much more reliable than other threded jointing method. I would avoid PTFE tape. You may also want to check liquid PTFE as it is also an excellent method for threded connections.
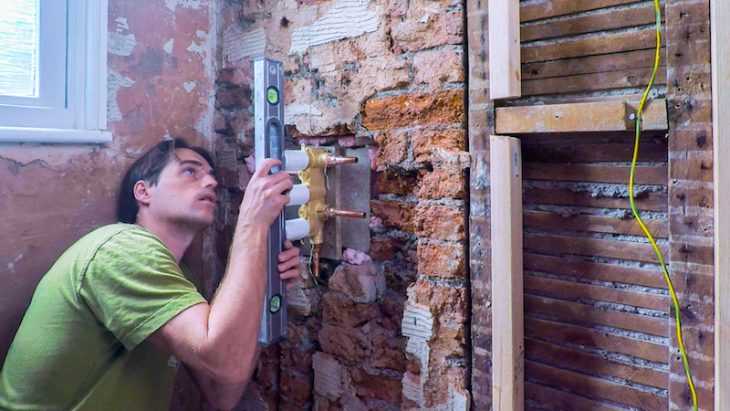
Now it is time to fix the valve to the plywood or chipboard making sure we get correct depth of installation. It may be required to pack it out with another layer of plywood. In my case I am using 2 layers of 22mm chipboard. You will have to level the valve in 2 planes and make sure it is at the right angle to your wall finishes by using a long level and a square.
shower valve levelling
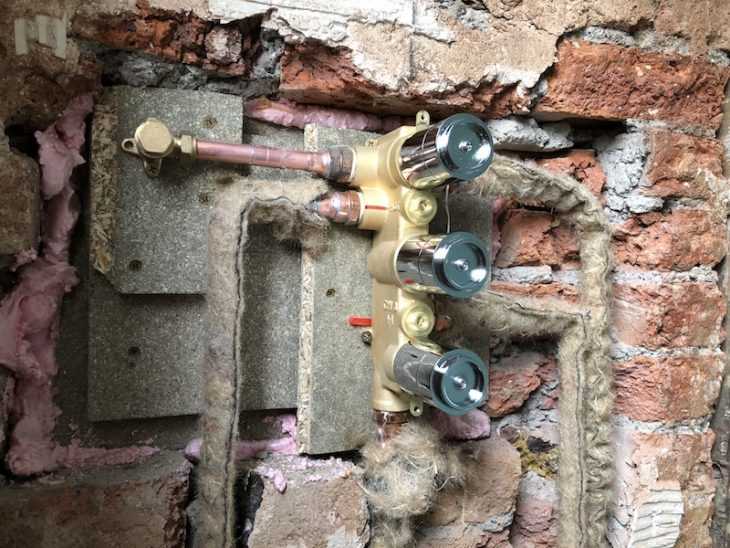
Next step is to connect your hot and cold supply to the valve by soldering end feed connections and connecting all your outlets. You may just have one shower outlet. In my case I am installing a 3 way diverter valve, which means I have total of 5 connections to be made: hot and cold supply, hand held shower outlet, fixed shower head outlet and a bath filler outlet.
Once all my connections are made I pressure test the installation making sure I do not have any leaks. Then I wrap pipework in lagging to protect if from building materials that will be used to dry line the wall.
Fully installed valve below:
recessed shower valve
Please leave a comment with any questions you may have or your own tips on how to install this type of a diverter valve.
Design Files for Vaillant Arotherm Heat Pump Installation
Below, you will find my design files and calculations for the installation of a Vaillant Arotherm Plus heat pump that you can see in my YouTube video: “Design Heating System Like A Pro”
20 November 2022
Vaillant Eco Tec Plus system boiler hot water priority diagrams
This are diagrams for domestic hot hot water priority set up using: – Vaillant system boilers – Vaillant SensoComfort controls with VR 71 wiring ceters – System with hot water cylinder, radiators and UFH
04 January 2022
Vaillant F.75 error code – full boiler repair
This Vaillant boiler has been suffering from error codes F.75 and low pressure on the pressure gauge. There was also a visible leak to the right-hand side of the boiler. When I opened the boiler, I found a source of the leak – it as scaled Automatic Air Vent on the boiler pump. First call […]